


StatPart I: How to host a static website step by step?
There are two things this tutorial explains:
- How to host a static website using Google Cloud Storage buckets for prototyping purposes;
- How to set-up Firebase Hosting for the live website.
The first step in any case is setting up a Google Cloud account. You can start with Google Cloud Storage or Firebase. The main prerequisites are a Google account and a debit/credit card. There is no difference between the two routes because having access to one gives you access to the other automatically.
Static Website Hosting with Google Cloud Storage
This is the the manual for hosting static websites on Cloud Storage: https://cloud.google.com/storage/docs/hosting-static-website. Conceptually, the process consists of four simple steps:
- Prove to Google as shown here that you have control of the domain name you want to host.
- Let’s say the domain name is
mywebsite.com, create a bucket in Cloud Storage calledwww.mywebsite.com - Configure the bucket to act as a web page as explained here:

Note that the entry for main page and not-found is the same, index.html. This way you can use browser side routing with libraries like react-router-dom and ensure at the same time that visitors can still access URLs like wwww.mywebsite.com/page1 directly.
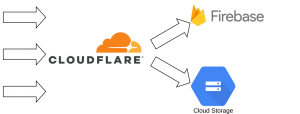
4. Configure your DNS provider to serve the content of the bucket as per the manual above. Cloudflare as a DNS provider I recommend offers the following cool features:
- They cache any static content for the website and reduce your bill for traffic (egress) from the bucket.
- They provide useful stats about traffic to the website removing the need for web page trackers initially. Later on, when there is steady traffic through your website knowing where people click can be relevant for further developments and web trackers become handy.
- The free tier of Cloudflare is pretty comprehensive and probably covers what your need.
The end!
Hosting the live website with Firebase Hosting and Clouflare
The approach above cannot be used to host the live website effectively. The main issue is that accessing directly any other path than the homepage, i.e. html.index, returns a 404 error response. From a practical point of view, visitors are unlikely to realise it, because they will be still seeing the right content, because of the way static react websites work. Unfortunately, page crawlers like the search engines will not index any paths with the exception of the home page because they will see the 404 error responses. In practical terms that means no SEO for your website!
Hence, Firebase Hosting comes to the rescue.
- The getting-started manual is here.
By default Firebase will generate two default URLs for your page:
{project-id}.web.app{project-id}.firebaseapp.com
where you can immediately see the deployed website.
2. Here is how to add your own domain name to that list.
3. Go to the Firebase to get the IP address for the hosted website and set up the DNS records in Cloudflare to point to that IP address as explained here.
Here is how the techccino.com records looked like on Cloudflare:

Note: the Cloudflare proxy status has to be set to DNS only in that case. Then, the TLS certificates from Let’s Encrypt will be automatically provisioned by Google for you.
After setting up the DNS records, it will take up to an hour for Firebase to actually provision a TLS certificate for the custom domain. Be patient!
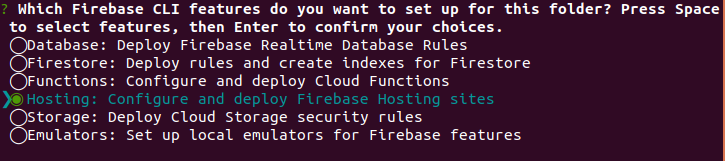
Firebase Command Line Interface (CLI) to upload the website
Upload the website using Firebase CLI wizard. How to install the CLI on your computer is explained here.
These are the steps to initialise the project locally:
- Run
firebase initin the folder where the staticreact-appis located. - Select hosting in the wizard.
3. Compiled react apps are stored by default in the build folder, which is your public directory.

4. All path requests must point to index.html for a react website.

5. Final step: do NOT overwrite if there is an existing build/index.html file.
Part II: Why go through all of this?
A brief attempt with WordPress
I opened my company in 2018 and I needed a website for it. Money was tight so I put something together using WordPress and hosted it on the virtual machine on Digital Ocean . This arrangement worked and it cost only $7/month back then. There were a few drawbacks though:
- The website was using only 10% of the WordPress functionality, i.e. no news section, user area, blog posts and so on.
- The TLS certificates were provisioned manually and every now and then they would expire. Oops!
- The virtual machine was running 24/7 when all what the Apache HTTP server was doing was serving static content.
- WordPress needed manual updates all the time.
None of these points was a deal breaker but the whole set-up was fragile.
Google Cloud Storage for Website Hosting
The cost of this approach is a few cents unless your page generates lots and lots of traffic.
Pros
- It is quick and easy to set-up.
- The TLS certificates are provided by Google, so no need for any extra work there.
- It is incredibly easy to prototype and make changes. If you need to deploy another version, just create a new storage bucket and update the DNS records accordingly.
Cons
- It does not work so well with react-router-dom: any route, except the homepage, returns
404 Not Foundfrom the Google Storage bucket because for apps with browser routing, the only document that needs to be served isindex.htmlSolution: set index.html as a response for 404 requests as well. - There are no stats about the website traffic.
Cloudflare for Basic Traffic Analytics
Cloudflare are the best value for money or no money at all with the free tier. It comes with out-of-the-box analytics based on the DNS requests for the website. You can immediately see the number of visitors over time and their country of origin. They also offer protection in case of attacks on your website.
Just to clarify, this is not to say Google or other providers don’t offer something similar, but the Cloudflare platform is incredibly clear and easy to use. Also this kind of traffic monitoring is the least intrusive in terms of privacy. The next step would be no monitoring at all.
While writing this article I had another look at the Cloudflare platform and found two extra really nice features:
- automatically compress (minify) static resources;
- the option to redirect mobile users to a sub-domain, optimised for mobile devices.
Not bad at all!
Conclusion
The proposed static website hosting with Google Cloud/Firebase and Cloudflare is simple, robust and very cheap to start with. If there is little traffic you will be paying pennies per month.
Techccino brings simplicity to every day operations so that our customers can keep building and expanding their business and not worry about unnecessary running costs and increasing complexity.
My name is Nik Vaklev and I am the founder of Techccino Ltd | Serverless Apps
That is a really good tip particularly to those new to the blogosphere. Brief but very accurate info… Many thanks for sharing this one. A must read article!